Continue to Site

Welcome to our site!

Electro Tech is an online community (with over 170,000 members) who enjoy talking about and building electronic circuits, projects and gadgets. To participate you need to register. Registration is free. Click here to register now.

  • Welcome to our site! Electro Tech is an online community (with over 170,000 members) who enjoy talking about and building electronic circuits, projects and gadgets. To participate you need to register. Registration is free. Click here to register now.

Keypad Labeling Ideas

Status
Not open for further replies.

MrAl

Well-Known Member
Most Helpful Member
Hi there,

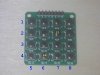
I was wondering if anyone had any interesting ideas on labeling a keypad that does not come with any numbers or letters, like the one shown in the attachment. Note the round part of the buttons are only about 1/8 inch in diameter, and each button is spaced only 3/8 of an inch from each other vertically or horizontally, so there is little room to do anything.

One simpler idea would be to color each key top with a color that corresponds to the function, but that would mean a lot of buttons might have to be the same color anyway so not that great of an idea. Usually keys have numbers or letters written on them, and for these that would be very hard to do because they are so small. So maybe an overlay or something, but made of what?

You guys might have some better ideas. Keep in mind though that these keypads are only 1.5 inches square (about 40mm square). So there is not much room to do anything fancy.

These are normally used for testing the uC functions. 16 keys gives a lot of input functions, and using 4 of them creates a 64 key keyboard, but without any labeling that can get pretty confusion as to what keys do what. They would also make a nice compact mini keypad for something you use a lot but want to keep small.

NOTE: Ignore the numbers, they were added later to the photo just to show the matrix pin combination for that particular key. All the keys are black right now.
 

Attachments

  • SwitchPad_16_Buttons-01e.jpg
    SwitchPad_16_Buttons-01e.jpg
    98.9 KB · Views: 265
I use a membrane for test purposes... The legends are removable so I can write what I want on them
https://uk.rs-online.com/web/p/keypads/0507497/

I have actually use the 4 x 1 keypad on a project..

As for your keypad, An overlay would be best... I have a cool laminator.. I print the legend then laminate it so its rigid enough to press the button underneath ( I have used small plastic washers glued under the newly laminated keypad legend for more stability...
 
With such a small keypad you might find the usual laminator 2-layer pouch makes the laminated overlay rather too rigid for button operation; in which case, use of just one layer would increase flexibility.
 
I recall printing small stripes of paper later fixed with adhesive. Just as habit, each key gets the legend above it. With yours seems not possible. All what I did up to now was temporary.
 
Hi,

All i have at the moment is a laser printer and label maker. If the laminator material works in a laser printer then maybe that would work.

If not, the paper strips sounds like it might work, although the printing would have to be very very tiny. This is for my own personal use only so it doesnt have to be professional, although a bigger font would be nice.
 
I would not put laminator plastic though a laser printer without knowing more about each. Perhaps the intent was to print on quality paper, then run that through a laminator.

If you can get access to a color laser printer, you could print a very nice template for the switches. I would laminate that and punch holes for the buttons.


John
 
I would not put laminator plastic though a laser printer without knowing more about each. Perhaps the intent was to print on quality paper, then run that through a laminator.

John
Yep! I use waterproof paper.... Then laminate it!!
 
Mr Al. I could print labels for you with a pTouch label maker. The smallest print is 2mm high by 1 mm wide. Black on white is the normal colors.

I'd need the edge to center distances, center to center distance and the max height, and the line text so I could print it all on one line.

The tape adhesive is revealed in two removable sections whose seam is horizontal along the tape,

I usually use 1/2" wide tape. See: **broken link removed**

Staples has the pTouch label makers. I think I got the maker for like $80 and the tapes are $20 at staples. Mine has electronic symbols on it. Fezder bought one.

Laser printer laminations
Possible. Remember the remote pics I sent you. Fast Signs did that one for me for about $20, but I researched how to do it myself with a laser printer and actually made a better quality label. To use the pressure sensitive stuff, you need a straight paper path for the printer. I can do that. You use laser printable pressure sensitive paper (must have a straight paper path) and clear pressure sensitive overlay.
I'd have to look up where I got the pressure sensitive stuff. It's not real cheap. Guessing $1.50 a sheet x 2.

You also have to figure out what side prints first and it may change based on paper path.

I've printed on post-it tape adhered to paper for test cases. I think I have 1" and 2" wide stuff.
I use post-it labels all the time for boxes.
 
Last edited:
If the laminator material works in a laser printer then maybe that would work.
Don't use ordinary laminator pouches, or you could gum up the laser printer! Print on ordinary paper and then laminate that. If you don't have a laminator, beg a pouch from someone and use a clothes iron on a cool setting.
 
I would not put laminator plastic though a laser printer without knowing more about each. Perhaps the intent was to print on quality paper, then run that through a laminator.

If you can get access to a color laser printer, you could print a very nice template for the switches. I would laminate that and punch holes for the buttons.


John

Hi,

I like the idea of punching holes, if i can find a punch with a diameter that small...not sure where to find one like that.

But that would look really nice, and the buttons would be pushed down and snap back up while the 'lamination' would not have to move making it last long.
 
Mr Al. I could print labels for you with a pTouch label maker. The smallest print is 2mm high by 1 mm wide. Black on white is the normal colors.

I'd need the edge to center distances, center to center distance and the max height, and the line text so I could print it all on one line.

The tape adhesive is revealed in two removable sections whose seam is horizontal along the tape,

I usually use 1/2" wide tape. See: **broken link removed**

Staples has the pTouch label makers. I think I got the maker for like $80 and the tapes are $20 at staples. Mine has electronic symbols on it. Fezder bought one.

Laser printer laminations
Possible. Remember the remote pics I sent you. Fast Signs did that one for me for about $20, but I researched how to do it myself with a laser printer and actually made a better quality label. To use the pressure sensitive stuff, you need a straight paper path for the printer. I can do that. You use laser printable pressure sensitive paper (must have a straight paper path) and clear pressure sensitive overlay.
I'd have to look up where I got the pressure sensitive stuff. It's not real cheap. Guessing $1.50 a sheet x 2.

You also have to figure out what side prints first and it may change based on paper path.

I've printed on post-it tape adhered to paper for test cases. I think I have 1" and 2" wide stuff.
I use post-it labels all the time for boxes.

Hi again,

That's interesting, that's the same label maker i have. I guess it does print small then. I think it might work, although that will be very small text.

I also have some pressure sensitive lamination sheets, i think i have one and a half sheets left, if i can still find them. Cant remember where i got them though, maybe at Walgreens or Staples.
 
Don't use ordinary laminator pouches, or you could gum up the laser printer! Print on ordinary paper and then laminate that. If you don't have a laminator, beg a pouch from someone and use a clothes iron on a cool setting.

Hi,

Yes good idea, i dont want to ruin this printer. I have some press on lamination sheets somewhere i'll have to find. They have stick on the back and completely enclose the paper from both sides. Not a pouch, just two sheets one on front and one on back. They dont seem to yellow over time either. Now if i can just find them :)
 
I have the sizes of 1, 2, 3, 4, 6, 9, 12 and Auto under size. I measured the character after selecting 1 mm and found them to be 1 w x 2 mm high. Using width seems to be. On 6 mm, I get 6 high and 4 wide. Kinda confusing, It was definitely 1 mm W x 2 mm high set to 1 and 6 mm high x 4mm wide when set to 6.

It looks like I need to measure and put those dimensions on the labeler. I have the PT-1400. I'm probably more comfy with inch dimensions.

I'd love to have an LED when the printer is printing. I keep getting "cutter errors" because I cut too soon.

I'd suggest finding a font that is about the same on the laser printer and then printing them like
Code:
(6) Help   (9)   Yes

on a piece of paper to check centering. The 6 and the 9 is the number of spaces counting the (x). I think mine prints in a fixed proportion font.

I love the labelmaker. Don;t buy the refills from Staples.
 
I was thinking of a small paper punch, which might be a little big. Biopsy punches will work, but they are often sharpened from outside in so as to avoid crushing the skin that is removed. Since you want to preserve the template, I would use a punch that is sharpened from inside to outer edge. I have used miniature brass tubing for that purpose. The wall is only 0.014" typically, and it is available in both metric and inch dimensions. The inch increments are 1/32 so the tubes telescope nicely. Get a tube the right size and shave the inner surface with a #11 hobby knife. Use something soft, like balsa for a backup board. You may need to sharpen it a couple of times in the process. Of course, SS hypodermic needle stock keeps its edge better, but is it harder to sharpen. McMaster may have punches that small.

John
 
John: I've used the biopsy punches for basically the same ting MrAl wants to do. , so I know they work. Never tried to sharpen them, though.
 
I didn't say biopsy punches wouldn't work. In fact, I said, " Biopsy punches will work."

Depending on variables such as the thickness of the plastic and the taper of the sharpened edge, the biopsy punch style will tend to distort edges of the hole. The inner sharpened punch will cause distortion of the "chad" (i.e., part that is punched out). Now, if the plastic were quite thick, say 1/32", that distortion can be pretty significant for a very small hole and may give an unacceptably raised edge around the circumference.

This project is apparently a one off, and thin tubing sharpened on the inside edge is easy to make and cheap. It is used often for paper, cork, rubber, and so forth, because that style preserves the edge of the hole better than the other type of punch. I was simply offering an alternative.

John
 
Hi,

I actually already have several diameters of brass tubing. I might give that a shot.

As to the printing, yeah i have better control with the laser printer and regular laser paper. I could just make thin strips i guess and glue them down.
I may end up making more than one, because i may have to make a larger keyboard with several of these things mounted side by side and top and bottom. Say at least 2 wide and 2 high for a total of 64 keys.

When i do this i have to marvel at the modern computer keyboard a little. Over 100 keys and you can get some of them for 10 bucks.
 
Status
Not open for further replies.

Latest threads

Back
Top