R
Robot builder 101
Guest
My latest robot, phobug!
Hello, this is one of my newest robots, taken off the design of the classic Herbie! I built this robot with help from the book, Junkbots, Bugbots, and bots on wheels. I would highly suggest this book, as it is a wonderful book thats worth taking a look at. You can buy it at solarbotics, or give the ISBN number to the store and they can order it.
Parts used:
LM386 Audio amplifier
2 IR recievers
9v battery
Power switch
2 Extreme quality motors pulled out of a PS2 (Playstation 2, its a video game console) controller [These make almost 0 noise. I couldn't even tell they were on at first]
The robot is very fun and easy to build, and is provided with lots of pictures from the book to help you out. I am a more advanced robot builder than this, but I have misplaced my other better robots for now, so you will just have to bear with me until i find them or build new ones (I prefer building new ones, isn't robot building fun)!
Here are a few pictures for you to check it out!
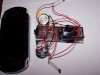
Phobug1: Phobug as compared to a PSP. The peice of black tape above the battery is the LM386. I put tape over it so that it would stay on the chip. You can also see the black IR reciever, and the motor. Cable ties worked well to mount the motors onto the aluminum body. The IR recievers are wired in reverse, because they create a enough voltage that it would fire the LM386. These IR receiver output about 0.6 volts.
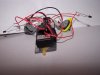
Phobug2: Frontal view (somewhat) of Phobug.
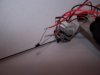
Phobug3: IR reciever soldered to wires. I freeformed everything, as described in the book.
I will post how to build your own phobug under projects soon, so if you would like to build one, please let me know along with your questions or comments.
Thanks
Hello, this is one of my newest robots, taken off the design of the classic Herbie! I built this robot with help from the book, Junkbots, Bugbots, and bots on wheels. I would highly suggest this book, as it is a wonderful book thats worth taking a look at. You can buy it at solarbotics, or give the ISBN number to the store and they can order it.
Parts used:
LM386 Audio amplifier
2 IR recievers
9v battery
Power switch
2 Extreme quality motors pulled out of a PS2 (Playstation 2, its a video game console) controller [These make almost 0 noise. I couldn't even tell they were on at first]
The robot is very fun and easy to build, and is provided with lots of pictures from the book to help you out. I am a more advanced robot builder than this, but I have misplaced my other better robots for now, so you will just have to bear with me until i find them or build new ones (I prefer building new ones, isn't robot building fun)!
Here are a few pictures for you to check it out!
Phobug1: Phobug as compared to a PSP. The peice of black tape above the battery is the LM386. I put tape over it so that it would stay on the chip. You can also see the black IR reciever, and the motor. Cable ties worked well to mount the motors onto the aluminum body. The IR recievers are wired in reverse, because they create a enough voltage that it would fire the LM386. These IR receiver output about 0.6 volts.
Phobug2: Frontal view (somewhat) of Phobug.
Phobug3: IR reciever soldered to wires. I freeformed everything, as described in the book.
I will post how to build your own phobug under projects soon, so if you would like to build one, please let me know along with your questions or comments.
Thanks
Attachments
Last edited by a moderator:
