Continue to Site

Welcome to our site!

Electro Tech is an online community (with over 170,000 members) who enjoy talking about and building electronic circuits, projects and gadgets. To participate you need to register. Registration is free. Click here to register now.

  • Welcome to our site! Electro Tech is an online community (with over 170,000 members) who enjoy talking about and building electronic circuits, projects and gadgets. To participate you need to register. Registration is free. Click here to register now.

battery spot welder problem

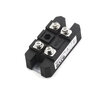
I got a cheap spot welding board and wanted to test it out. Since i got no LiPo handy, i thought i could use a microwave transformer and a 100A 1600V rectifier since board needs DC. I tried with both 7.5V and 12V coming out of the transformer. I basicaly get nothing. It barely shows on the 0.1mm strip, doesn't go through. If i had to guess i would say im not even getting 1 amp out. Transformer should be more than capable to supply enough amps to at least make a spark. Is there something im missing here ?
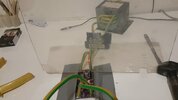
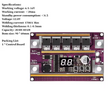
20250413_010002.mp4_snapshot_00.02.487.jpgScreenshot 2025-04-13 020407.pngS35101595a88a4716b093c6bc5f58bfe52.jpg
 
Yeah, you’re spot on - without smoothing caps after the rectifier, the board’s getting nasty ripple, not real DC. Most of these boards need stable DC to fire properly, especially for short high-current bursts. That ripple alone can kill the weld power. Paralleling 10–20 capacitors sounds like the right move. I’ve used low ESR electrolytics for this kind of setup and it made a huge difference. Also agree on the 2S5P 18650 pack- just keep an eye on pulse loads. Looks like you’re on the right track now.
 
I may be mistaken but I think the aluminium SMD electrolytic capacitor may be connected as shown in the schematic below:

View attachment 149593

If this is the case, the diode and capacitor will help keep the control electronics voltage the same during the weld cycles. If the voltage on the input (anode of the diode) drops, the capacitor will remain charged and will maintain the voltage that was previously there. It doesn't need to be that large, only large enough to supply whatever small amount of current is needed for the control electronics during the welding cycles. If I am correct about this, you should be able to connect another capacitor in parallel with that one to prevent the board from turning off during welding. Can you use a multimeter on continuity check mode to see if the diode and capacitor are connected as they are in the schematic I posted?
I tried measuring between capacitor (positive side) and board input (positive). The reading read 0.7V for a brief moment, jumped to 1.8V and kept rising. So that would indicate that there is a diode between cap and input ?

I did try to put a 3000uF resistor in parallel with the existing 470uF one and can confirm that the board no longer turns off. Now i have to do a proper resistor bank, see if it helps. I tried soldering 2 0.15mm tabs together today and its no go as it is.
 
Ok so i finished this project, sadly as it is, it isnt usable.

- I added about 81.000uF worth of caps in parallel (about 50 caps), though it's normal caps, not super caps, so their power delivery is probably still very weak
- Transformer exit reads about 7.3V, capacitors which are connected to rectifier exit read about 9.3V, spot welding board is said to support 6-16V or 9-16V depending on which data to belive
- Board control has its own power source so even if board input sags to 0V, it will stay on
- System as it is, cannot weld 2x 0.15mm tabs together
- During the weld, killawatt reports 315W peak power draw, though cant be sure how accurate this can be due to short pulse
- If i bypass the mosfets on the board and connect rectifier negative directly to 1 of the spot welding tips and short them for a few seconds, i get a reading of over 900W. So the system is certanly able to pack a punch. That should be well over 100A considering the voltage also drops. Then ofcourse, there are losses. No part of the system heats up except the coil, so it's hard to figure out where the power is lost.

At this point, if anyone has any ideas i would be more than glad, because im stuck. I could try to increase the voltage coming from the transformer to about 14V, that would mean the rectifier exit would give me about 16V, the maximum the board allows. But it will be hard. The 6 gauge wire i used leave no space for more turns, so i would have to either use thinner wire or make a custom insulation with high temperature tape. Right now it just seems that the system isnt able to deliver that instant punch in the alloted 99ms. Sadly i cant increase that value, and its high as it is.
 
I tried a battery powered type one and sent it back, it worked (or not) about as well as yours. I got a supercapacitor based one instead, that uses a small AC power brick to charge the caps. That works really well, way better on a very low setting than the battery one on its highest.
 
Now board is shutting down again, but even at lower settings. Rectifier still reads 0.4V continuity on + and 1.8V on -
Where are you putting the probes for the 1.8v reading? The highest reading you should be able to get is two diode drops (1.4v max) with one probe on DC + and the other on DC-, less for your rectifier since it's rated for high currents and the meter test current is usually no more than a few mA. For the individual diodes the 0.4v reading or the 0.51v reading you got earlier both sound plausible for a working diode.

Also the ESR for your capacitor bank is no less important than the actual combined capacitance. A high ESR capacitor bank will still be unable to provide large pulsed currents. You can check the datasheet for your caps if you've got it.

At this point if you really want to use this board instead of a supercapacitor-based solution like rjenkinsgb suggested, I would highly recommend borrowing a car battery from someone and testing the board with it to rule out the board simply being crap.
 
Red on plus, black on minus gives nothing (unlimited), red in minus, black on plus gives 0.9V.
Red on any of the AC inputs and black on plus gives 0.51V, red on any of the AC inputs and black on minus gives nothing (unlimited)
 
Red on plus, black on minus gives nothing (unlimited), red in minus, black on plus gives 0.9V.
Red on any of the AC inputs and black on plus gives 0.51V, red on any of the AC inputs and black on minus gives nothing (unlimited)
That sounds about right. I'd still check with a car battery to rule out the board being bad before you keep trying to get the rectifier and smoothing cap setup working.
 
I don't know who supplied your welder, but this is what you need.

1745541731652.png


The power source ESR ought to be as low as possible to the parallel x mohm FET switches. It must be much lower than the ionization resistance of the welder arc to be reliable. The bigger the arc, the lower is the arc resistance. Faraday proved that.
 
Last edited:

Latest threads

Back
Top