Continue to Site

Welcome to our site!

Electro Tech is an online community (with over 170,000 members) who enjoy talking about and building electronic circuits, projects and gadgets. To participate you need to register. Registration is free. Click here to register now.

  • Welcome to our site! Electro Tech is an online community (with over 170,000 members) who enjoy talking about and building electronic circuits, projects and gadgets. To participate you need to register. Registration is free. Click here to register now.

self test warning buzzer

Status
Not open for further replies.
I hear you about their search engine. They have crap all over and you have to find the dang category.

The old "horn" is inop. That is the problem I am having. The one that is one there is prone to failures. For me to replace it costs 65 bucks plus shipping. I figured if I could get the right parts I could build an "in dash" alarm and light that would be better than factory.

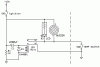
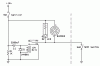
Are all the parts listed for the first schematic or the second one you posted?
 
Parts are for the first one. If you were going to just drive the in-dash buzzer and LED you could use a much smaller PCB mount relay. 12VDC Coil DPDT Miniature PC Relay - RadioShack.com
For the second circuit the delay depends on the relay coil resistance, the capacitor value, and the drop-out voltage of the relay. The capacitor could be 1000uF, 2200uF, 3300uF, or 4700uF depending on the particular relay.

Ken
 
The original alarm does not work at all and I just want to disconnect it. The only loads on the circuit would be the light and the buzzer I will install in the dash. I do have a small automotive relay. It is a smaller ford relay. I am not sure of the specs. So what capacitor I use would determine how long it beeps when the key is turned on? Even though the second diagram looks simpler, is it better to use that one or stick with the first. I don't really have any restrictions space wise under the dash. I can run to RS tomorrow and see if they even stock any of the stuff on the list. I guess it just depends on a finalized list of which componants I need and how many of each. I am pretty excited to actually build this on my own and getting it to work. Thanks for the help so far!!
 
Actually, I do have a slightly more simple monostable circuit. You lose the MOSFET, a resistor ,and a diode, but the capacitor is much bigger.

I vote for this circuit. Much simpler, and a 3300 µF cap is no big deal (though I wonder if Radio Shack has them? probably, if you can find the damn things).

By the way to the O.P.: "monostable" is a fancy-schmancy way of saying "circuit that generates a single pulse".
 
Last edited:
The second one works fine. The first one would be a little more compact if necessary. If space is not critical, I'd go with the second. But, you would have to play with the capacitor and the particular relay you use. The first is not dependent on what relay you have or buy.

Good night. :)

Ken
 
Ok, call me stupid, can someone draw in the buzzer and the light into the second drawing? Or is it the same on that side of the relay as it is on the first drawing?
 
Yes, all the "power" stuff--all the stuff we want to control--goes on the "outboard" side of the relay, connected to its switch contacts.

And no, I won't be calling you stupid.
 
The diode D1 is added across the relay coil contacts right? I am assuming this, and that it is not part of the relay. Also, if I plan to disconnect the old horn out of the picture, how would I simplify the whole drawing. I will be using the power supply wire from the key on and the switched ground wire from the temp sensor. I want to eliminate the old alarm completely as it is no good. I will have to run wires from the control box(where the original alarm is located) up to the dash to make the new alarm and idiot light.
Looking at the radio shack website, they do not list a 3300uf cap that I can find. They do list all the ones in the first drawing. If I cannot get the 3300(or whatever big one I need to match my relay), would I be better off with the first diagram? Radio shack lists all the parts for that one, whether they have them at my local store is a different story.
 
Last edited:
Radio Shack lists several electrolytic caps on their site: 1000 µf ones, and big honking 4700 µf ones. I'd just get maybe two of the 1000s, wire them in parallel (plus to plus, minus to minus) to make a 2000 µf cap. If it doesn't create a long enough beep, throw another one in parallel. Or just get the larger capacitor, which will have a longer delay time.
 
Last edited:
Try this. Actually, if the ground is common throughout the 12V system, then you only need one wire (the top one) from the temp switch to the relay. The NO contact on the relay can be wired to the ground in the timer circuit.

Ken
 

Attachments

  • Relay Monostable Temp and Horn 02.gif
    Relay Monostable Temp and Horn 02.gif
    12 KB · Views: 161
  • Relay Monostable Temp and Horn 03.gif
    Relay Monostable Temp and Horn 03.gif
    12.3 KB · Views: 141
Last edited:
Awesome! What size cap should I start out with? The more caps you add in parallel means a longer beep? If they only have 1000uf caps should it be safe to just buy 3 right away and play with them and see what fits best?
 
1000uF
Yes
Yes. The change in time is proportional to the change in capacitance. 1000uF=Xseconds...2200uF=2.2*Xseconds
Ken
 
Cool. They had everything on the list you gave me, much much appreciated. They had the 2200uf cap so I will start there. I am going to the garage to tinker now, so wish me luck. If I get frustrated I might have to take a break and mow the lawn.
 
Just another small mod'. With the LED/buzzer wired directly to the ignition switch (in the one-wire-from-temp-switch version) you don't need the D1 diode. It was there so you get a brief alarm when you turn on the switch, but not when you turn it off.

Ken
 
Well good thing those diodes come in a two pack. The first one I was checking the relay after soldering it to the relay and it popped. Now you say I don't need it in there anyway so I won't worry about it.

I had some trouble with it at first, but turns out I just had one of the terminals mixed up on the relay due to the small numbers on the bottom. I got it bench tested and i works great. The beep and light are IMO a perfect time with the 2200uf cap. Now I just have to get it installed in the boat without getting wires mixed up and such. I will let you know how it turns out once on the boat.
 
Last edited:
1. Diodes, buzzer, LED, and electrolytic capacitor have a polarity that most be observed.
2. Are you sure you are using the correct switching pins on the relay?
3. Do the LED and buzzer work by themselves?
4. If everything is wired correctly, the short delay may mean you need a bigger capacitor.
5. Any chance you post a photo of your wiring setup?

Are you using the Radio Shack automotive relay or the small PCB one?

Ken
 
Last edited:
I think you replied before I edited my earlier post. I had one of the terminals mixed up on the relay. The tiny numbers were hard to see and for some reason I kept hooking up to the nc instead of no side. Then when I went to switch I moved the feed side instead, it was a dumb mistake.

I have it all rigged up in the boat and I cannot be happier. It works great. The buzzer sounds just like the OE one used to. Now I also have the LED in the dash as well, so that is cool. Thanks for all you help. It was fun putting all that together.
 
Great job! I hope this encourages you to venture further into the world of electronics.

Ken
 
It was fun, and this opens me up to learning more in the future. If I had to do it again I would mount everything to a board to keep it seperated and a little cleaner. It took some time to make sure everything was sealed up and won't touch each other, but I got it. It looked like a taped together mess. I would love to learn how to make circuit boards.
 
Status
Not open for further replies.

New Articles From Microcontroller Tips

Back
Top